Creating a mini CMS in ASP.NET
Monday, March 7, 2011
ASP.NET applications are so smart, compiling pages on the fly and so on, that a basic application consisting of a web.config, a base page and a masterpage is a really good, simple ‘mini CMS’. Here are the steps to produce one:
- Create a blank solution in Visual Studio (File, New, Project, Other Project Types, Visual Studio Solutions, Blank Solution). Put it in your source folder. I’ll use MiniCMS as the Name, and c:\src as the Location. Leave Create directory for solution checked. Click OK. This creates a folder c:\src\MiniCMS containing a single file MiniCMS.sln
- Right-click the solution in Solution Explorer, choose Add, New Web Site. Select ASP.NET Web Site in your favorite language (I’ll choose VB.NET here). At the bottom, select File System and enter a subfolder of your solution folder in the text box next to it. I’ll choose c:\src\MiniCMS\www. Clicking OK creates a folder www in the solution folder, containing an empty App_Data folder, a Scripts folder containing various jQuery script files, a default page Default.aspx and aweb configuration file Web.config.
- Right-click the newly added www project, then choose Properties Window. Change the Virtual path from /www to /. (This makes the web site ‘forget’ it’s running in the www folder.)
- Delete the Default.aspx page – wel’ll create a new one later on.
- Right-click the www project in Solution Explorer and choose Add new item. Select your favourite language, then Master Page. Leave the name at Masterpage.master or change it if you like. Uncheck Place code in separate file. Click Add.
- Edit your master page to suit your needs, by renaming ContentPlaceHolder1 to something like MainContent. (This would also be a good time to create a content placeholder for the script tags in your master page, so you can easily add event handling code and such to your pages.)
- Right-click the www project, select Add ASP.NET folder, then App_Code.
- Right-click the App_Code folder that was just added to the project, then choose Add new item, then select Class in the list. Change the name to BasePage.vb (or choose another name). Click Add.
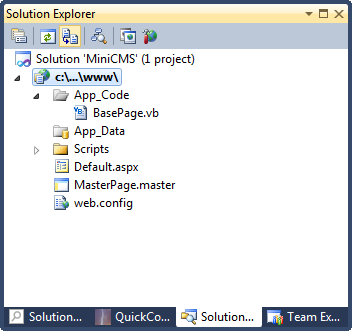
- Re-create the Default.aspx file by right-clicking the www project again, selecting Add new item again, this time selecting Web Form. Change the Name to Default,aspx, leave Place code in separate file unchecked, check Select master page. Click OK. In the next screen, leave our Master page selected and click OK again. If prompted, overwrite the existing Default.aspx file.At his point, your solution should look like this:
- Edit the first line, adding Inherits=”BasePage” so it looks like this:
<%@ Page Title="" Language="VB" MasterPageFile="~/MasterPage.master" Inherits="BasePage" %>
This makes sure your pages (and all other pages you’ll be creating by copying this empty page) will share all the code you put in your BasePage class.
Congratulations. You have now created a very simple CMS. Why?
- Your pages all have the same structure, captured in your master page. You can, of course, have multiple master pages if you like.
- Adding a new page is as simple as copying the empty Default.aspx page to a new name (just make sure it ends in .aspx) and editing the content placeholders.
- You have a central place to store code for all your pages because they all inherit code from the BasePage class.
- All VB (or C#) code plus markup is stored inline, i.e. in your pages; there’s no ‘hidden’ content in code behind files. (Of course, shared code should go into the BasePage class, keeping the inline code down to a minimum)
- No explicit compilation is needed: change content of files or even add files to the www folder on the web server and everything is compiled as necessary – mostly, it ‘just works’. Great.
And yes, I know using inline code instead of code behind files is not the recommended “Visual Studio Way” – I’d never seriously consider it for a classic compile-then-deploy project. But it sure is effective for small sites that need simple, editable content.
All that’s left to do now is to copy the skeleton web site to your web server. You just need the www folder (that’s why we used the blank solution first: to keep the actual solution file and other files not explicitly necessary for the web site away from the content). You can do this by right-clicking the www project and choosing Copy web site. After the initial copy, you can edit the entire site in-place on the web server if you want – exactly right for a mini CMS.